Free Sunburst Granny Square Crochet Pattern for Beginners — Step by Step
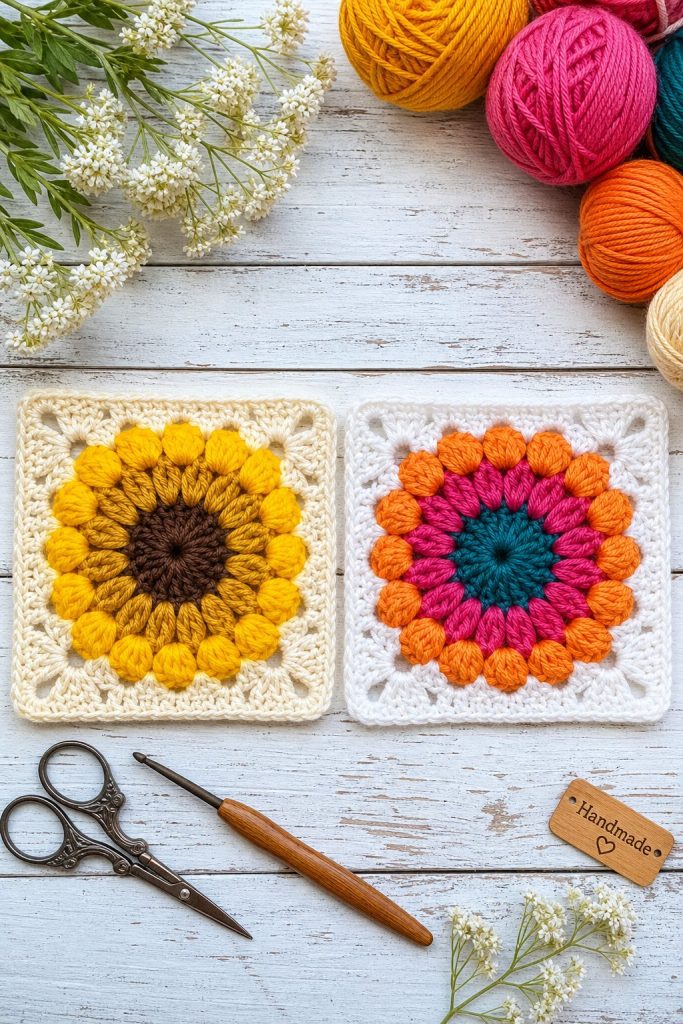
The sunburst granny square is one of the most beautiful and most saved crochet patterns on Pinterest — and for good reason. This stunning square combines a bold textured center with a classic granny square border, creating a finished motif that looks far more complicated than it actually is. If you can make a basic granny square, you are ready to tackle this one.
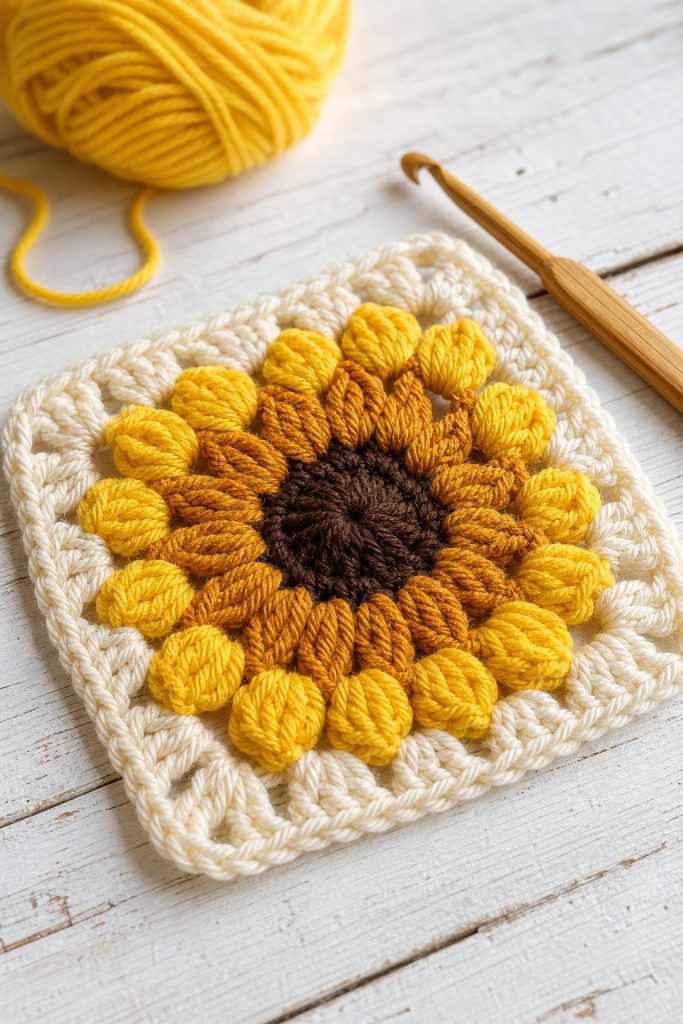
This free sunburst granny square pattern walks you through every single round step by step — including the puff stitch center, the bobble stitch petals, and the final square-forming round. Four colors, four rounds, and one absolutely gorgeous result.
Use it as a sunburst in bold jewel tones. Switch the colors to golden yellow, brown, and white and it becomes a stunning sunflower granny square. Either way, this little square is guaranteed to become your new favorite crochet motif.
What Makes the Sunburst Granny Square Different
Unlike the basic granny square which uses only double crochet stitches throughout, the sunburst granny square uses three different stitch types — each one creating a distinct layer of texture:
Round 1 — Double crochet: Creates a solid circular center in your first color.
Round 2 — Puff stitches: Creates the inner petals — soft, rounded, and beautifully textured — in your second color.
Round 3 — Bobble stitches: Creates the outer sunburst petals — bold, dimensional, and striking — in your third color.
Round 4 — Varying stitch heights: Transforms the round flower into a perfect square using single crochet, half double crochet, double crochet, and treble crochet — all in your fourth background color.
The result is a square with a beautiful raised flower motif in the center, surrounded by a clean flat border. It is genuinely one of the most impressive-looking squares you can make as a beginner.
Two Ways to Use This Pattern
Sunburst Version: Use bold, contrasting colors — jewel tones like purple, pink, orange, and white — for a graphic, eye-catching square perfect for pillows and blankets.
Sunflower Version: Use warm chocolate brown for Round 1, golden mustard for Round 2, bright golden yellow for Round 3, and soft cream or white for Round 4. The finished square looks exactly like a sunflower — one of the most pinned crochet projects of all time.
What You Will Need
Yarn Worsted weight yarn (weight 4) in 4 colors. You only need small amounts of each — this is a perfect scrap yarn project.
For the Sunflower version:
- Color A: Chocolate brown (center) — approximately 5 yards
- Color B: Golden mustard (inner petals) — approximately 8 yards
- Color C: Bright golden yellow (outer petals) — approximately 10 yards
- Color D: Soft cream or white (square border) — approximately 15 yards
For a Sunburst version use any 4 contrasting colors of your choice.
Recommended yarn brands:
- Lion Brand Pound of Love
- Red Heart Super Saver
- Caron Simply Soft
Hook US G-6 / 4.0mm crochet hook
Note: This pattern uses a 4.0mm hook — slightly smaller than the basic granny square’s 5.0mm. The smaller hook keeps the puff and bobble stitches firm and defined.
Other Supplies
- Scissors
- Tapestry needle for weaving in ends
Crochet Abbreviations
| Abbreviation | Meaning |
|---|---|
| ch | chain |
| sl st | slip stitch |
| sc | single crochet |
| hdc | half double crochet |
| dc | double crochet |
| tr | treble crochet |
| sp | space |
| yo | yarn over |
| st | stitch |
| PS | puff stitch |
| BS | bobble stitch |
Special Stitches — Read Before You Start
This pattern uses two special stitches you may not have worked before — the puff stitch and the bobble stitch. Both are easier than they look. Read through these instructions before you start Round 2.
How to Make a Puff Stitch (PS)
The puff stitch creates a soft, rounded raised bump on the surface of your work. Here is how to make one:
- Yarn over. Insert hook into the stitch. Pull up a loop to the height of a double crochet. You have 3 loops on your hook.
- Yarn over. Insert hook into the same stitch. Pull up another loop to the same height. You have 5 loops on your hook.
- Yarn over. Insert hook into the same stitch. Pull up a third loop to the same height. You have 7 loops on your hook.
- Yarn over and pull through all 7 loops at once.
- Chain 1 to lock in the puff stitch. One puff stitch complete.
The key to a beautiful puff stitch is pulling all loops up to the same height before pulling through. If some loops are taller than others the puff will look uneven.

How to Make a Bobble Stitch (BS)
The bobble stitch creates a firm, rounded bump that pops toward you. It looks similar to the puff stitch but uses a slightly different technique:
- Yarn over. Insert hook into the space. Pull up a loop. Yarn over and pull through 2 loops. You have 2 loops on your hook. This is one incomplete double crochet.
- Make 3 more incomplete double crochets in the same space the same way. You now have 5 loops on your hook.
- Yarn over and pull through all 5 loops at once.
- Chain 2 to lock in the bobble stitch. One bobble stitch complete.
The bobble stitch is worked into the spaces between puff stitches — not into the puff stitches themselves.
Free Sunburst Granny Square Pattern
Finished size: approximately 4 inches x 4 inches Skill level: Beginner-Intermediate Hook: US G-6 / 4.0mm Yarn: Worsted weight in 4 colors (A, B, C, D)
Round 1 — The Center (Color A)
Chain 5. Join with a slip stitch to the first chain to form a ring.
Chain 3. This counts as your first double crochet.
Work 15 double crochet stitches into the ring.
Join with a slip stitch to the top of the beginning chain 3. Fasten off Color A.
You now have 16 double crochet stitches arranged in a circle. Pull the starting tail to tighten the center ring closed.
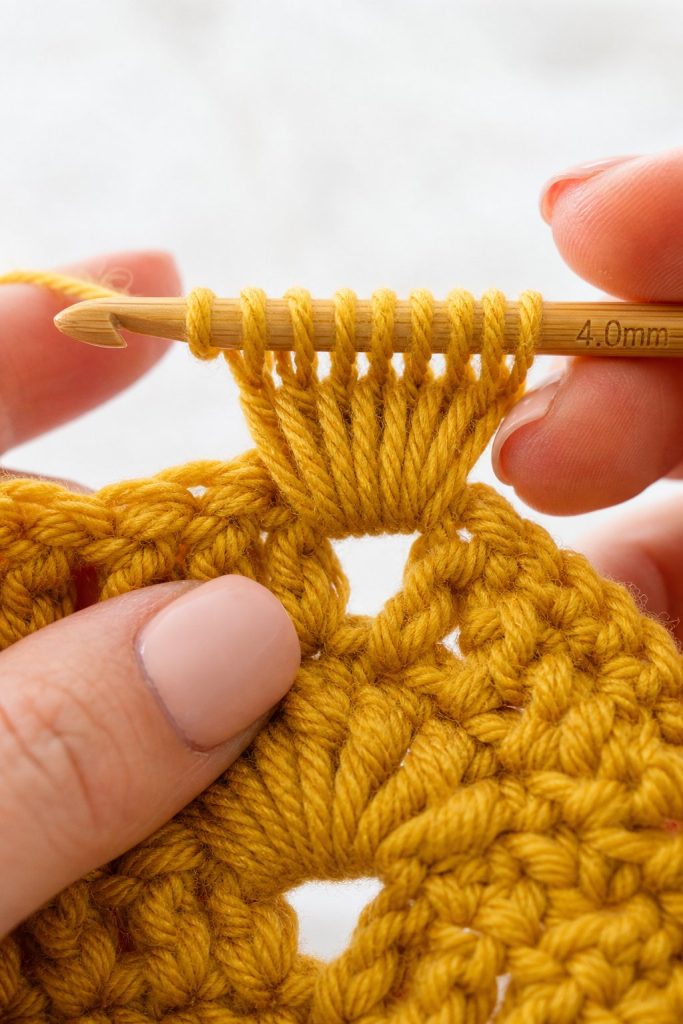
Round 2 — Puff Stitch Petals (Color B)
Join Color B with a slip stitch to any stitch from Round 1.
Chain 2.
Make a puff stitch in the same stitch as joining:
- Yo, insert hook, pull up loop (3 loops). Yo, insert hook, pull up loop (5 loops). Yo, insert hook, pull up loop (7 loops). Yo, pull through all 7 loops. Chain 1 to lock.
*Make a puff stitch in the next stitch. Chain 1 to lock. Repeat from * in every stitch around.
Join with a slip stitch to the top of the first puff stitch. Fasten off Color B.
You now have 16 puff stitches arranged in a circle, each separated by a chain-1 lock stitch.
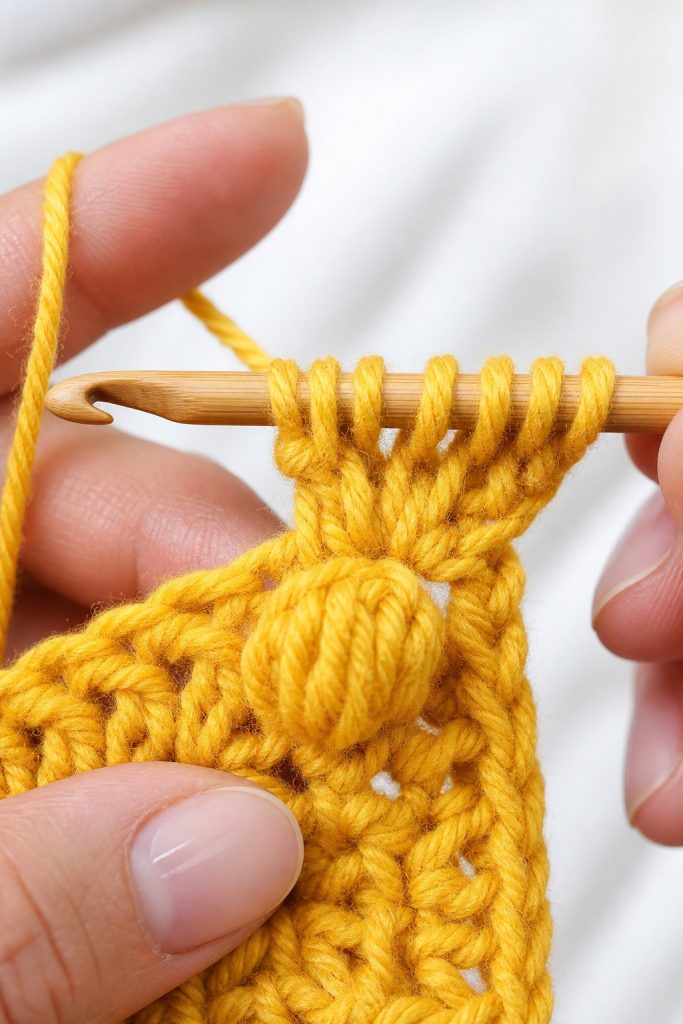
Round 3 — Bobble Stitch Sunburst (Color C)
Join Color C with a slip stitch in any space between two puff stitches.
Chain 3.
Make a bobble stitch in the same space:
- (Yo, insert hook into space, pull up loop, yo, pull through 2 loops) 4 times in the same space. Yo, pull through all 5 loops. Chain 2 to lock.
*Make a bobble stitch in the next space between puff stitches. Chain 2 to lock. Repeat from * in every space between puff stitches around.
Join with a slip stitch to the top of the first bobble stitch. Fasten off Color C.
You now have 16 bobble stitches arranged in a circle. At this point your work still looks circular — Round 4 is where it transforms into a square.
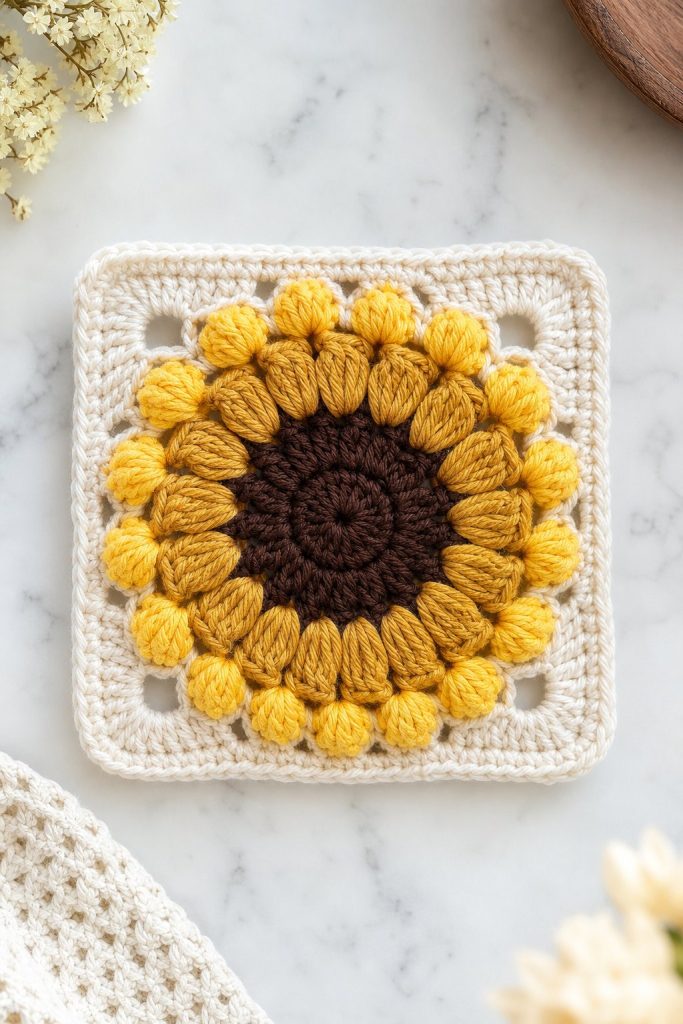
Round 4 — Forming the Square (Color D)
This is the most important round. It uses varying stitch heights — single crochet, half double crochet, double crochet, and treble crochet — to pull 4 points of the circle outward into square corners while keeping the 4 sides flat.
Join Color D with a slip stitch in any space between two bobble stitches.
Work the following sequence 4 times (once for each side of the square):
Side section:
- Sc in the current space between bobbles
- Hdc in the next space between bobbles
- Dc in the next space between bobbles
Corner:
- Tr, chain 2, tr in the next space between bobbles
Coming down from corner:
- Dc in the next space between bobbles
- Hdc in the next space between bobbles
- Sc in the next space between bobbles
After completing all 4 sides and 4 corners, join with a slip stitch to the first sc. Fasten off Color D.
You now have a beautiful square with 4 defined corners and a flat border on each side. The raised flower motif is framed perfectly by the Color D border.
Weave in all ends.
Understanding the Square-Forming Round
Round 4 works by using the natural height differences between crochet stitches to shape the circle into a square. Here is why it works:
- Single crochet — the shortest stitch, keeps the sides flat and low
- Half double crochet — slightly taller, transitions smoothly
- Double crochet — taller, begins the slope toward the corner
- Treble crochet — the tallest stitch, creates the peak of each corner
By building up stitch heights toward the corner and then mirroring them back down, you create 4 natural corner points with 4 flat sides between them — turning a circle into a square without any complicated shaping.
How to Add More Rounds
Want a larger square? After Round 4, you can add classic granny square rounds to make the square as large as you like. Using Color D or any new color:
Slip stitch to the nearest corner chain-2 space. Work 3 dc, chain 2, 3 dc into the corner. Work 3 dc into each side space with a chain 1 between clusters. Repeat for all 4 corners and sides. Each additional round adds approximately 0.75 inches per side.
Finishing Your Square
Weaving in ends: This pattern generates more ends than the basic granny square because you use 4 different colors. Thread each tail onto a tapestry needle and weave it through the backs of the matching-color stitches in a small zigzag for at least one inch. Trim close to the work.
Blocking: Blocking makes a significant difference with this pattern because the puff and bobble stitches can pull the square out of shape. Wet the finished square, gently squeeze out the water, and pin it flat into a square shape on a blocking mat using rust-proof pins at all 4 corners. Leave to dry overnight. The flower center will bloom beautifully and the square will lie perfectly flat.
Color Combination Ideas
Classic Sunflower: Brown center, golden mustard petals, bright yellow outer petals, cream border — the most popular version on Pinterest
Wild Sunflower: Dark chocolate center, deep amber petals, warm golden yellow outer petals, white border — bold and striking
Spring Garden: Pale yellow center, mint green petals, soft pink outer petals, cream border — fresh and feminine
Bold Jewel Tones: Deep teal center, bright magenta petals, sunny orange outer petals, white border — graphic and modern
Autumn Harvest: Burnt orange center, deep rust petals, golden yellow outer petals, cream border — perfect for fall projects
Winter White: Silver grey center, pale lavender petals, soft white outer petals, cream border — elegant and minimal
Desert Bloom: Terracotta center, dusty rose petals, warm peach outer petals, sand/cream border — boho and on-trend
What to Make With Sunburst Granny Squares
Sunflower Tote Bag Make 2 large sunburst squares (or join 4 smaller ones per side) and seam them together to create a beautiful sunflower bag. Add a simple chain handle and a button closure.
Throw Blanket Join 80–100 squares in a 9 x 10 grid for a gorgeous throw blanket. The raised texture looks stunning when all squares use the same color scheme. Alternate between sunburst and plain granny squares for a beautiful mixed-texture effect.
Pillow Cover Make 2 sunburst squares (or 4 for a larger pillow). Join 3 sides, insert pillow form, close the fourth side with slip stitch or button closure.
Wall Hanging Make 5–7 sunburst squares in graduating colors and hang them on a piece of driftwood with rustic twine for a beautiful boho wall decoration.
Table Runner Make 6–8 squares and join them in a single row for a stunning table runner. The raised texture catches the light beautifully on a dining table.
Baby Blanket Use soft, machine-washable yarn. The sunflower color scheme (yellow + brown + cream) works beautifully for a gender-neutral baby gift.
Beginner Tips for Perfect Results
Practice the puff stitch on a swatch first. Before starting your actual square, practice 4–5 puff stitches on a small piece of scrap yarn. The motion of pulling up three loops to the same height takes a little muscle memory to get consistent.
Keep all your puff loops the same height. The most common puff stitch mistake is letting some loops be taller than others. Aim to pull each loop up to about the height of a double crochet stitch — roughly 3/4 inch tall.
Work the bobble stitches firmly. The bobble stitch should feel a little tighter than your regular stitches. This is intentional — a firm bobble holds its shape and pops nicely toward the front of the work.
Count your stitches after Round 1. You should have exactly 16 dc stitches. If you have more or fewer, the puff and bobble rounds will not line up correctly. Recount and fix before moving on.
Block generously. This pattern benefits from blocking more than any other granny square. The puff and bobble stitches tend to pull the center inward slightly before blocking. After a good wet block the square will be flat, even, and the flower will look absolutely perfect.
Common Mistakes and How to Fix Them
My puff stitches look flat and skinny You may not be pulling your loops up tall enough. Each loop should be pulled up to the height of a double crochet before pulling through. Taller loops create fuller, rounder puffs.
My bobble stitches sink into the back of the work instead of popping forward You may be working with the wrong side facing you. The bobble naturally pops toward the front — make sure the right side of your work is facing you throughout Rounds 2, 3, and 4.
My finished square is round, not square Round 4 did not form correctly. Check that you used the exact stitch sequence — sc, hdc, dc, tr, ch2, tr, dc, hdc, sc — and that the treble crochets hit the correct position (every 4th space) to form the corners.
My square is warped or uneven This almost always resolves with blocking. Wet block with pins at each corner and leave overnight. If it is still uneven after blocking, check whether your stitch tension is consistent across all 4 sides of Round 4.
I have too many or too few bobble stitches in Round 3 You should have exactly 16 bobbles — one in every space between the 16 puff stitches. Count your puff stitches after Round 2 and place exactly one bobble in each gap.
Frequently Asked Questions
Do I need to know how to make a basic granny square first? It helps to understand the basics of working in rounds and joining rounds, but the sunburst pattern actually teaches you new stitches rather than relying heavily on the classic granny technique. The most important prerequisite is being comfortable working into a ring and joining rounds cleanly.
Can I use a different hook size? Yes. A 4.0mm hook gives the firmest, most defined puff and bobble stitches for worsted weight yarn. If your tension is very tight, try a 4.5mm hook. If you want a larger finished square, use a 5.0mm hook — but the puffs and bobbles will be slightly softer and less defined.
Why does this pattern use 4.0mm instead of 5.0mm like the basic granny square? The smaller hook keeps the puff and bobble stitches firm and defined. With a larger hook the puffs can look loose and floppy. The smaller hook also keeps Round 1 tight enough that the center ring does not pucker outward.
How do I make this into a sunflower square specifically? Use chocolate brown for Color A (center), golden mustard for Color B (puff petals), bright golden yellow for Color C (bobble petals), and soft white or cream for Color D (border). This color combination is the classic sunflower look that has been pinned millions of times on Pinterest.
How many squares do I need for a throw blanket? For a standard throw blanket (approximately 50 x 60 inches) using 4-inch squares, you will need around 150 squares in a 12 x 13 grid. If you add one or two extra granny rounds to make 5.5-inch squares, you will need approximately 90 squares in a 9 x 10 grid.
Can I make this pattern in just two colors? Yes. Use Color A for Rounds 1 and 3 (center and bobbles), and Color B for Rounds 2 and 4 (puffs and border). This gives a more graphic, high-contrast look — beautiful in black and white or navy and cream.
What does “chain 1 to lock” mean after a puff stitch? After pulling through all 7 loops of the puff stitch, the stitch needs a locking chain to keep it from unraveling. Simply yarn over and pull through the single loop on your hook. This is a very short chain — just one stitch — and it secures the top of the puff permanently.
My Round 4 looks messy — how do I fix it? Round 4 is the trickiest round because it uses 4 different stitch heights. Work slowly and count carefully. Place a stitch marker in the chain-2 of each corner as you complete it — this helps you keep track of where you are in the repeat. If it still looks off, try working a practice Round 4 on a scrap circle before attempting it on your actual square.
More Free Granny Square Patterns
Once you have mastered the sunburst square, here are the other beautiful patterns in this series:
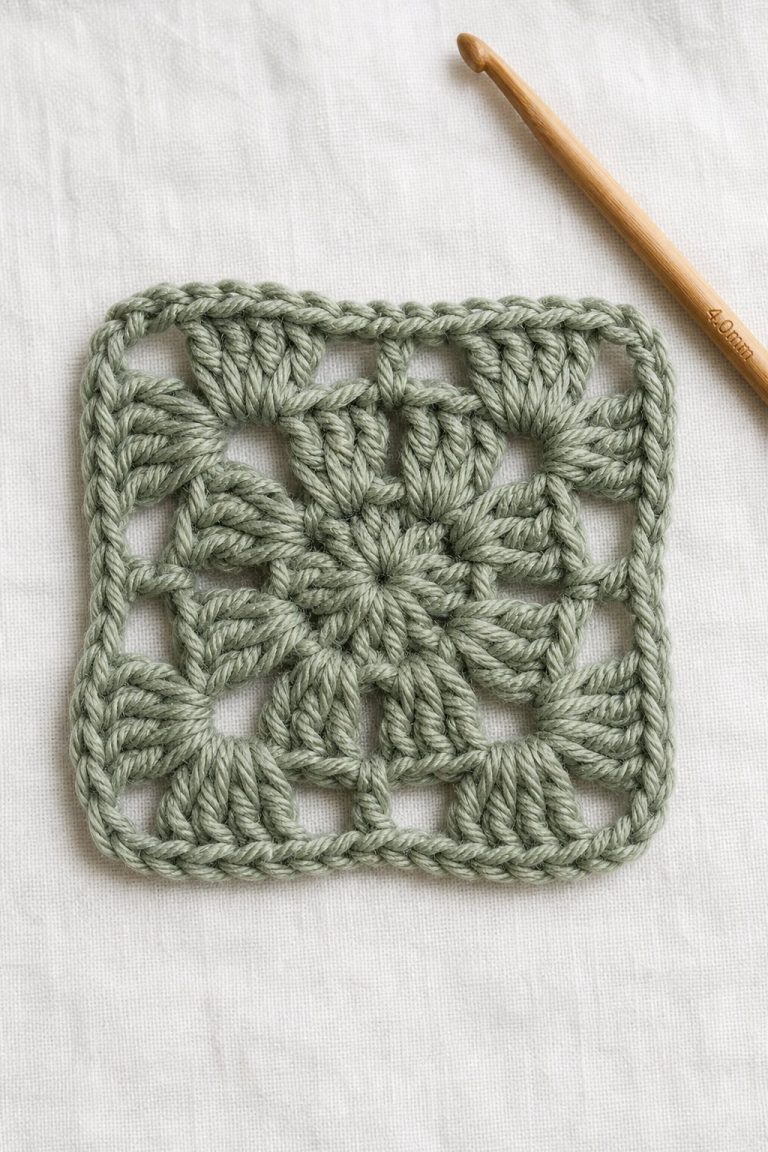
- Basic Granny Square — the essential foundation, worked in simple double crochet clusters with full step-by-step instructions
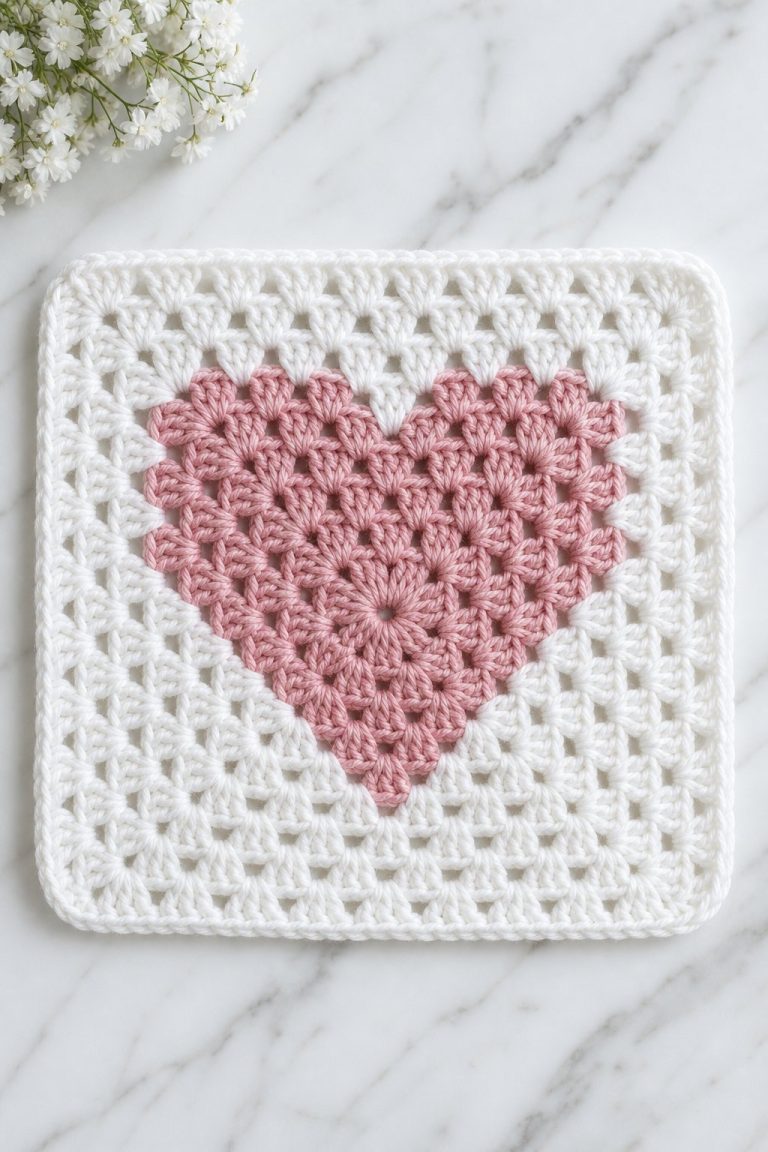
- Heart Granny Square — a sweet heart motif created through color changes, perfect for Valentine’s and baby gifts
- Daisy Granny Square — a cheerful flower variation perfect for spring and summer projects
- Solid Granny Square — no gaps between stitches for a dense, warm fabric great for bags and winter items
- African Flower — a striking hexagon motif that joins beautifully into statement blankets and cushion covers
Final Thoughts
The sunburst granny square is one of those patterns that stops people in their tracks. The layered texture, the bold floral center, the clean square border — it looks like something you would find in a boutique, not on your crochet hook at home.
But here is the truth — once you learn the puff stitch and the bobble stitch, this square works up beautifully. The technique clicks faster than you expect, and by your third or fourth square you will be moving through the rounds with confidence.
Save this pattern, pin it to your crochet board, and come back whenever you need inspiration. And when your first sunburst square is finished — especially if you make it in sunflower colors — share a photo in the comments. We genuinely cannot wait to see yours.
Happy crocheting!